CLICK HERE FOR FREE BLOGGER TEMPLATES, LINK BUTTONS AND MORE! »

Monday, November 15, 2010

Mailbox Monday for increased Traffic

This is a great idea for anyone who wants to boost their subscriber count or just traffic to your blog.  These girls are on to something!  I am so excited to give this a try.  Click on the Mailbox Monday button to give this a try!

Friday, November 12, 2010

Personal 72 Hour Emergency Survival Kit

This is a great buy at $59.99 plus with every order, you get a free Food Storage Calculator which is worth $14.95
This comes from Disaster Necessities .  Check out their site!!

I have put these together myself and I know I spent way more than this!  You can add a few personal things to this and it will be ready to go!


Product Description


Personal 72 Hour Emergency Survial Kit “EVERYTHING KIT”
*As FEATURED on the TODAY SHOW!!!*


This 72 Hour Emergency Survival Kit has a little of everything, from search and rescue to trauma medical supplies.


1 – Large Backpack

1 – 3 Pack 8.5 oz. Water

1 – “D” size Flashlight

1 – Pack Alkaline Batteries

1 – 2400 Calorie Food Bar

1 – Pair Goggles

1 – Solar Blanket

1 – Hard Hat

1 – Work Gloves

1 – Burn Free Jel

1 – Gauze

1 – Bandages 1 – Clipboard

1 – Pencil & Accountability Forms

1 – Dust Mask

1 – AM/FM Radio with Batteries

1 – Whistle with Lanyard

1 – 15" Pry Bar

1 – Roll Duct Tape

1 – Roll ‘Caution’ Tape

1 – Safety Vest

1 – CPR Mouthpiece

1 – Ice Pack

1 – Adhesive Tape

Get all your 72 Hour Emergency Survival Kits from Disasterncessities.com!

All Prices in US Dollars

*Keep in mind this is only for 1 person.  You would need to get one for every person in your house.

Wednesday, November 10, 2010

7 Steps To Food Storage


Follow This link to find a guide called The 7 Steps To Food Storage.  This comes from AreYouPrepared.com a great website for all your emergency preparedness needs.

Cartoon Yourself!

If you want to have a little fun, go to MyWebFace to cartoon yourself.  You can actually do alot with your photos on this site.  Save your pic and add to facebook or save to computer photos to use as an avatar!

One Way To Get A Little More From That Ever Shrinking Dollar

Be sure to sign up for email alerts from the Dollar General website .  They have lots of coupons to apply to their already low prices and an awesome sweepstakes going on right now.  Check out this site for amazing savings!

Tuesday, November 9, 2010

Sign up for FREE Newsletter and Lots more!

Lots of coupons for Holiday cooking and Great recipes.  Join here and save big!

Emergency Preparedness: FOOD STORAGE NOW


I think the the very best thing anyone can be doing right now is to store extra food.  Store the food you like to eat and use from it and then replace it. 
Depending on our geological location we are all faced with different emergency situations.  But according to all credible sources on inflation, we are about to see food prices explode!  Most experts feel by June of 2011 the food we use every day will quadruple in price!  That is crazy!  Right?  Actually, that is a modest projection.  Click here  for a report by NIA.
Why not be on the safe side?  Better safe than sorry! 
There are many ways you can do this.  You can just buy extra when you go to the store or you can shop with  food storage specialists like Emergency Essentials
I have personally used this online preparedness store for years and I have never been disappointed. 
Whichever method you decide on, it is important to decide! 
I will be posting on this subject every day, as I feel it is of utmost importance to all of us.  Check bank for ideas and resources to help you in this endeavor.
Joni

Free Printable Thanksgiving Dinner Planner

Need help planning for Thanksgiving Dinner?  This wonderful and FREE printable from Moms Budget is so awesome!  You can download it Here or visit the website .  There are also many other Holiday printables and organization helps.  Check this website out!! 

Sunday, November 7, 2010

While searching the internet for deals, I have yet to come across anything better than Old Navy for babies and toddlers.  I ordered this onesy for $2.99 along with some other great deals.  They always have very cheap items.  Sometimes you have to look hard for them, but keep looking, they are there.  For instance, this color of onesy was the only one that was $2.99, the others were higher.  Sign up for their email alerts and get a free gift and gift on your birthday.  Also, free shipping always with orders over $50.
And, if that wasn't enough, from 11/11 - 11/18 you can get a coupon to take an extra 30% off just for liking Old Navy on Facebook.  Just go to your facebook page and type in Old Navy and like their page.  Scroll down a little and you should see the offer for 30% off.   Happy Shopping!
Joni

Friday, November 5, 2010

Turkey Helps

These wonderful helps come from http://www.myrecipes.com/ which is a compilation of recipes from Cooking Light, Southern Living, Sunset, Real Simple and Health Magazines.


Buying the Thanksgiving Bird


There are basically seven different types of whole turkeys: frozen, fresh, natural, organic, free-range, heritage, and kosher. Frozen is the cheapest and most widely available. The drawbacks: you'll need considerable time to thaw in the refrigerator, and it may be injected with a salt solution to keep moist. See Sunset.com's "Pick the Perfect Turkey"  for a quick primer on the differences between the turkey types.

How Much Turkey to Buy


A good rule of thumb is to buy 1 pound of turkey per person to allow for seconds and leftovers. So if you're having 8 guests for Thanksgiving, you'll need an 8-pound bird. You know your crowd best, so buy the size that fits your needs.
Get ready for the feast with our ultimate collection of  Thanksgiving Recipes.

Turkey Defrosting Tips


The best–and safest–defrosting method is to set the bird in a shallow pan in the refrigerator for 24 hours per 5 pounds of turkey. Keep in mind you'll need to save room in the refrigerator as this will take several days. The turkey is fully thawed when the thick part of the turkey registers 40 degrees. For tips to defrosting in a hurry, read, "The Turkey is still frozen"  at RealSimple.com.


Roasting Turkey for Beginners


The key to roasting a perfect turkey is the temperature; you want moist, juicy meat on the inside and a crisp exterior. Keep your meat thermometer close by to ensure the bird reaches a safe internal temperature of between 165 and 180 degrees. An average 12-pound turkey with giblets will take around three hours to cook at 325 degrees. For a step-by-step guide, go to CookingLight.com


Deconstructing Turkey Carving


"The whole turkey may look really pretty, but taking slices from the outside of the breast is difficult," says Cooking Light Test Kitchens staffer Sam Brannock. For a step-by-step guide, watch our "how to" video on turkey carving or read more of Sam's tips at CookingLight.com.


Check out the link below for 9 different turkey ideas.  This is the first one!
Dry-Cured Rosemary Turkey


First-time Thanksgiving hosts might relate to Lori P, who shares this success story:

"This was rated by the most critical of my family to be the best turkey of all time. It was great that it was my first large-scale hosting of Thanksgiving for the family.... it made me proud."


Wednesday, November 3, 2010

Double Chocolate Warm Pudding Cake


This is from Very Best Baking .  Check out their great Holiday recipes!


Prep:10 mins
Cooking:20 mins
Cooling:0 min
Yields:9 servings

Guests will love the combination of moist cake with chocolate sauce. Enjoy this simple take on southern baking warm from the oven and topped with light whipped topping or ice cream.

Ingredients

nonstick cooking spray
1 cup all-purpose flour
1 1/4 cups granulated sugar, divided
3 tablespoons plus 1/4 cup NESTLÉ® TOLL HOUSE® Baking Cocoa, divided
2 teaspoons baking powder
1/4 teaspoon salt
1 can (12 fl. oz.) NESTLÉ® CARNATION® Evaporated Lowfat 2% Milk, divided
1 tablespoon vegetable oil
1 teaspoon vanilla extract
2 tablespoons water
Lowfat whipped topping or ice cream (optional)

Directions

PREHEAT the oven to 350° F. Spray 8-inch-square baking pan or dish with nonstick cooking spray.

COMBINE flour, 3/4 cup sugar, 3 tablespoons cocoa, baking powder and salt in medium bowl. Add 1/2 cup evaporated milk, oil and vanilla extract; whisk until just blended. Spread batter into prepared baking pan.

COMBINE remaining 1/2 cup sugar and 1/4 cup cocoa in small bowl. Microwave remaining 1 cup evaporated milk and 2 tablespoons water in small, uncovered microwave-safe bowl on HIGH (100%) power for 1 minute. With wire whisk, stir in sugar-cocoa mixture into milk mixture until blended. Gently pour over chocolate batter in pan.

BAKE for 20 to 25 minutes (25 to 30 minutes if using glass dish) or until cake layer forms on top and edges are bubbly. Let stand for 10 minutes. Spoon into serving dishes, spooning chocolate sauce over cake. Top with whipped topping.

TIPS: • Individual servings can be reheated in microwave for 10 seconds.

Tuesday, November 2, 2010

Southern Chocolate Chip Pecan Pie

A Family Favorite!

1 9-inch unbaked Pie Crust Shell
1 Cup Pecan Halves
1/2 Cup semi-sweet Chocolate Chips
4 Eggs slightly beaten
1/4 Cup melted Butter (no substitute)
3/4 Cup light or dark corn syrup
1 Scant Cup granulated Sugar or 1 Cup Brown Sugar
1 Teaspoon Vanilla

Spread the pecans and the chocolate chips over the bottom of the unbaked pie crust.  Beat eggs slightly.  Add melted butter, corn syrup and sugar; blend well.  Stir in vanilla.  Pour egg mixture over pecans and chocolate chips in pie shell.  Bake for 45 - 60 minutes until center of pie is set.  Cool before serving.  While cooling, melt 1/4 chocolate chips and 3 Tablespoons of whipping cream in the microwave for 30 seconds at a time until melted.  Garnish with melted chips and pecans.

Ganache-Glazed Peanut Butter Tart


Ingredients


1 cup crushed chocolate wafer cookies

3 tablespoons sugar

3 tablespoons butter, melted

1-1/2 cups half-and-half or light cream

2 tablespoons all-purpose flour

1/4 teaspoon salt

3 egg yolks

1/3 cup sugar

1/2 cup creamy peanut butter

1 teaspoon vanilla

4 ounces bittersweet chocolate, chopped

5 tablespoons butter, cut into small pieces

1 tablespoon light-color corn syrup

Directions

1. Preheat oven to 350 degrees F. For crust: In a medium bowl, combine crushed chocolate cookies and the 3 tablespoons sugar. Stir in the melted butter. Press mixture onto the bottom of an ungreased 9-inch tart pan that has a removable bottom. Bake about 10 minutes or until set. Cool on a wire rack.

2. For filling: In a medium saucepan, combine half-and-half, flour, and salt. Cook over medium heat until simmering, stirring frequently.

3. In a small bowl, combine egg yolks and the 1/3 cup sugar. Gradually whisk hot half-and-half mixture into egg yolk mixture. Return egg yolk mixture to saucepan. Cook and stir over medium heat until mixture is thickened and bubbly. Remove from heat. Whisk in peanut butter and vanilla until combined. Pour into crust, spreading evenly. Cover and chill for 3 hours.

4. For ganache: In a small saucepan, combine chocolate and the 5 tablespoons butter. Cook and stir over low heat until melted. Remove from heat. Stir in corn syrup; cool for 10 minutes.

5. Pour ganache over filling; tilt pan to allow ganache to flow evenly over tart. Cover and chill for 1 to 24 hours.

6. Let stand at room temperature for 10 minutes before serving. Using a small sharp knife, gently loosen edge of tart from side of pan; remove side of pan. Makes 16 servings

Sunday, October 31, 2010

Walmart Value of the Day


Personalized Fall Photo Mug, 11 oz

•Surprise someone special with this personalized mug
•Ceramic mug features a fall design and your photo
•Perfect for enjoying seasonal hot cocoa, coffee or tea
$6.00 + shipping to home or Free Site to Store.

Walmart Value of the Day Link

Free Blog Templates and Backgrounds!


If you like this Fall Template I have used on my blog, you can view more at LeeLou blogs .  She always has new FREE stuff for every season, holiday and/or occasion!  Check it out! 


There are also more free templates at Bloggy Got Back .  They have lots of free web and blog disigns for all occasions.  They also do blog and web design.  Very easy to install on Blogger.

Great New Find For Bargain Shopping!

I just found the Greatest! site for high-end department store bargains!  It's called ideeli.  Thanks to "This Mama Loves Her Bargains"  for posting this awesome find!  I have already ordered from here and it is all it professes to be.
Joni
When you tell your friends about this and when they sign up and purchase their first item, you get $25 in spending credit!

Saturday, October 30, 2010

2009 and 2010 Memories


Want to get this 8 x 8 hardback photo book for FREE?  Go to Shutterfly, set up account and create your book.  You have to upload lots of pics.  It is only 20 pages, but you can put many pics on a page.  When you are checking out, locate the promo code box and enter:  CK64-A4D1-X3N2-NTZ6Z5  and all that you should be charged is $8.99 for shipping.  Great Christmas gift idea!  If it does not work, shoot me an email and I will get right back to you.  jonimays_64@hotmail.com
Joni

Friday, October 29, 2010

Food Storage Analyzer From Emergency Essentials

If you have food storage and are serious about keeping it organized and up to date, then this is the tool for you.  Not only is it the very best tool I have ever used to keep track of my own personal food storage, but it is completely FREE!  All you do is put in your information and it calculates exactly where you are in terms of the number of people you would need to feed and total calories and nutritional information.  For instance, when I finished my alaysis, I realized I was very low on vitamin C for my families needs.  I would never have been able to calculate that on my own.  When you receive your analysis you can order items you are short on right from the very same page.  It is that easy! 
I have used Emergency Essentials for years to obtain my years supply and emergency preparedness supplies.  This is a very reputable company and I would recommend them to anyone and everyone.


Gift Card Giveaway

Monday, October 25, 2010

I wonder what your husband and kids would say if they got up on halloween morning and asked for bacon and eggs and this is what you served them??


Sunday, October 24, 2010

Under A Spell - Red Devil Cake


For this recipe, use the kraft foods box on right and put in "Under A Spell-Red Devil Cake" in the search box.  It will pull up picture and recipe.  This is a great tool for finding awesome recipes.  If you want it on your blog or just on the homepage of your computer, just click the button that says "Grab This" and follow the directions!  Also, some great Fall and Halloween recipes at Kraft Foods.
Joni

Saturday, October 23, 2010

Tombstone Taco Dip

Ingredients

1 16-ounce can refried beans with green chiles

1/4 cup bottled salsa

2/3 cup bottled ranch salad dressing

2 teaspoons taco seasoning

1 1/2 cups finely chopped cooked chicken

1 7-ounce pouch refrigerated guacamole

1/2 of a 2 1/4-ounce can chopped pitted ripe olives, drained

shredded lettuce

10-inch tortillas

Directions

In a small bowl, combine refried beans and salsa. Spread refried bean mixture in a 2-quart rectangular dish. In a small bowl, combine ranch salad dressing and taco seasoning; stir in chicken.

Spoon on top of the beans in an even layer. Spoon guacamole in small mounds on top of the chicken mixture. Carefully spread to an even layer.

Cover and chill at least 30 minutes or up to 6 hours before serving. Just before serving, place tombstone characters into dip. Sprinkle the graves with chopped olives and shredded lettuce.

Serve with tortilla chips.

Tortilla Graveyard Characters: Using cookie cutters or a knife, cut 10-inch tortillas of any flavor into gravestones, cats, owls, bats, fence rails, and a tree. Bake in a 350-degree oven for 5 to 7 minutes or until firm and crisp. Cool on rack.
*If you have a favorite mexican layer dip you can substitute with that.  Then add the effects shown here.
Joni

Eeeeeek!!!!!


As much as I dislike (that's putting it mildly) spiders of any kind, I had to show you these.  Aren't they absolutely hideous?  Very real looking!  Great for a real scary Halloween party.  These come from http://www.bhg.com/.  I love that site.  You can always find a great idea there for any holiday.
Joni

Friday, October 22, 2010

Love Those Crocs!


Great deal on Crocs, but only for a few more days!  Click on Frugal Living above to get code and website.
Joni
Hey everybody!  If your looking for a great deal, click on Frugal Living in the bar above and check out the Dollar General coupon deal.  Hurry!  It only lasts until Saturday 10/23/2010.
Joni

Thursday, October 21, 2010

Great Pary Ideas!!!


If you need help planning one of your childrens birthday party, this is the place to go for help!  This is the most awesome site I have ever been on.  Wow!  These girls are amazingly talented.  Great ideas and links.  Check it out.  http://www.karaspartyideas.blogspot.com/

Witch's Wands

Find this great recipe idea at Our Best Bites.  Click on the Button at the botton of my page!


Tuesday, October 19, 2010

Maple Leaf Cookies

Sometimes you just are not into the Halloween thing and you just want something awesome for Fall.  Here is a great idea.

This recipe came from http://www.beatuntilfluffy.blogspot.com/ I love her site.
Be sure to check it out if you love amazing recipes and ideas.
Joni 


Maple Leaf Cookies


1/2 Cup Unsalted Butter (room temperature)

1/2 Cup Dark Brown Sugar

1 Tsp Baking Powder

1 Egg (room temperature)

3 Tbsp Maple Syrup

1/2 Tsp Pure Vanilla Extract

1 3/4 Cups All-Purpose Flour


In your mixer bowl, mix butter, sugar and baking power until well-combined. Add the egg, maple syrup and vanilla and 'Beat Until Fluffy.' Mix in the flour and chill the dough for an hour or until easy to handle. Heat your oven to 375 degrees and line your cookie sheets with parchment paper. On a floured surface, roll the dough to 1/8" to 1/4" thick, cut with cookie cutter, place on cookie sheet and bake for 7 minutes. Cool on wire racks.


For Icing:


2 Cups Confectioner’s Sugar

2 Tbsp Light Corn Syrup

4 Tbsp Milk (you’ll need a little more after you’ve whisked in the first amount to get a dipping consistency)

1/4 Tsp Maple Flavoring

Food Coloring Kit (I used the recipes on the back of the box to make the brown and orange)


In a smallish bowl, whisk all ingredients together. Keep slowly adding milk until you get a slightly thick, spread-able icing. The icing will settle out and smooth nicely once you’ve applied it. I set aside an amount in 3 extra bowls with icing and colored it from there. I then dunked the cookies face-down, let the excess drip off and turned them iced-side-up to dry on wire racks. By all means, if you prefer, put the icing in a zip lock bag and snip off a corner for a make-shift icing bag. This icing will set fairly quickly, allow a little extra time if you ice thickly.


Courtesy of Dawn @ BeatUntilFluffy.com

Some Rights Reserved

Cool Pumpkin!

I found this cool idea on http://www.pinkapotamus.blogspot.com/
There is a complete tutorial under the heading of Holiday Helps.
Check it out!


More Great Ideas from Little Inspirations

This idea uses plain brown lunch bags.  You simply cut slits in the bag, fill and put in a stick and tie with raffia or ribbon.  Use your imagination!  This has lots of possibilities!!
Great idea and Quick!  Just fill sugar cones with fall colored candy and top with a chocolate frosted cookie.  You could add candy embelishments if you want.

Monday, October 18, 2010

Frosting Lover's Halloween Delight*)


If you love frosting the way I  do, you will love these awesome halloween cupcakes!  The cupcake recipe that follows is Great!, but if you are pressed for time a cake mix will do.  But, be sure to use the frosting recipe!  It won't be the same without it.
Joni

Ingredients


Cupcakes:

3/4 cup (1 1/2 sticks) unsalted butter, cut into pieces

1/2 cup root beer, flat

1/3 cup unsweetened Dutch-processed cocoa

1 1/4 cups all-purpose flour

1 1/4 cups sugar

1/2 teaspoon baking powder

1/4 teaspoon baking soda

1/4 teaspoon fine salt

1/4 cup sour cream

2 large eggs, room temperature

1 teaspoon pure vanilla extract

Frosting:

8 large egg whites

1 1/2 cups granulated sugar

1/2 teaspoon cream of tartar

1 pinch fine salt

1 teaspoon banana extract, or more to taste

1 to 2 drops pastel food coloring, optional

Candied eyeballs

Equipment: 12 cup standard muffin tin

Directions

Preheat the oven to 350 degrees F. Line standard muffin tins with cupcake liners or spray footed cupcake holders with nonstick spray.


Put the butter, root beer, and cocoa in a microwave-safe bowl, cover with plastic wrap, and microwave on HIGH until the butter melts, about 2 minutes. Whisk to combine.


Meanwhile, whisk the flour, sugar, baking powder, baking soda, and salt together in a large bowl. Whisk the sour cream, eggs, and vanilla together in a small bowl.


Whisk the hot cocoa mixture into the dry ingredients. Stir in the sour cream mixture just to combine; take care not to overmix. Divide the batter evenly between the prepared muffin cups, filling each one about 3/4 of the way full, about 1/4 cup per cupcake. Bake cupcakes until a toothpick inserted in the center of the cake comes out clean, about 25 minutes. Cool the cupcakes completely in the tin on a rack. Remove from liners and return cakes to a rack.


For Frosting: Bring a few inches of water to a boil in a saucepan that can hold a mixer's bowl above the water. Whisk the egg whites, sugar, cream of tartar, and salt in the bowl by hand. Set the bowl above the boiling water and continue whisking until the mixture is hot to the touch and the sugar dissolves, about 1 to 2 minutes. Transfer the mixture to a standing mixer fitted with the whisk attachment and beat at medium-high speed until eggs beat up into a cool stiff meringue, about 5 minutes. Add a few drops of desired extract and/or food coloring and lightly beat into the meringue.


To decorate: Using a spoon, offset spatula or piping bag, dollop, spread or pipe about 1/2 cup meringue on top of each cupcake to make a ghost or monster of your choice. Decorate with candied eyeballs or other candies. These can be finished 2 to 3 hours in advance and held at room temperature.


Copyright 2007 Television Food Network, G.P. All rights reserved

Friday, October 15, 2010

More great Halloween Ideas! Be sure to visit Amy's website.

A Tasteful Halloween with Amy Atlas

Amy Atlas events (love that name) is a firm specializing in desert tables. Not only do they bring you candy, check out their eye-candy:
*
halloween food and candy buffet table
Fantastic Halloween desert buffet. Be inspired by Amy’s spooky centerpiece of bare black branches decorated with licorice rolls!
*
halloween witch cupcakes with witch hats
Here we have a box of cupcake witches with waffle cone hats, licorice hair and candy corn noses!
*
halloween jellybean trick or treat bag
These little pumpkin-inspired candy bags are a perfect giveaway for the trick or treaters.
*
halloween cakes cookies and candy apples buffet
Yellow and orange rum balls, ghost cookies and pumpkin candy apples, just to mention a few.ghost candy apples and candy corn cookies for halloween buffet
Whoopie pies, candy corn cookies and yes, that is candy apple ghosts in the background!

Thursday, October 7, 2010

Another Cute Idea from Celebrations.com

Crafts

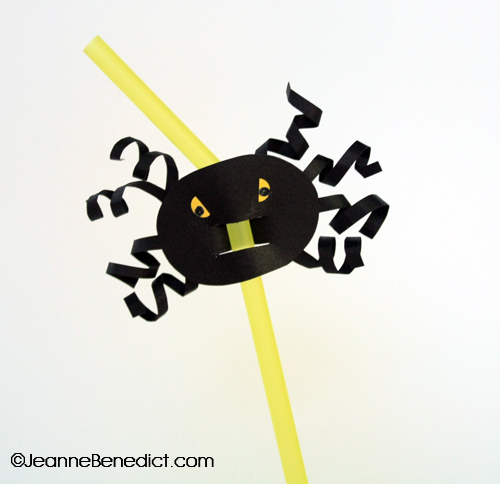
Spider Straw Slip On

By Jeanne Benedict, Celebrations Expert
Comments: 0 | Rating: 0.00
This silly spider straw slip on makes a great accent to any Halloween drink.

Supplies

1 sheet each (8 1/2 x 11) black & yellow cardstock
Scissors
Glue stick
Toothpick
Hole punch
Black fine tip marker
Scrap cardboard or cutting mat
Craft knife
Straw

Directions

halloween spider straw slip on

  1. Cut black cardstock into an oval that is @ 1 1/2-inches by 2-inches. (Don’t worry about making a perfect shape. I think a misshapen spider is very cute!)
  2. Cut 8 (1/4-inch) thin by 3-inch long strips of black cardstock for the spider’s legs. Coil each strip around the toothpick to give it make it a spiral. Apply glue stick to the ends of the spider legs and attach them to the back of the spider; 4 on each side. 
  3. Punch a hole out of the yellow cardstock and cut the punched-out hole in half for the spider’s eyes. Apply each eye to the spider using glue stick. Draw the spider’s pupils on to the yellow eyes using the black mark.
  4. Place the spider (right side up so you can see his eyes) on the scrap cardboard or cutting mat. An adult should use the craft knife to cut 2 (1-inch long) horizontal slits through the spider’s body below his eyes for the straw to slip through.
  5. Insert the straw through the slits from the back of the spider position it near the top. Plop it into a Halloween drink as decoration!

Toad-ally Tasty Punch

This non-alcoholic ghoulish treat looks like a witch's brew but tastes like a refreshing fruit juice cocktail. Finish it off with rainbow shebert and gummi frogs! Eek.

Ingredients

  • 1 5 oz Package Haribo Gummi Frogs
  • 1 4.8 g Packet (makes 2 quarts) Kickin' Kiwi-Lime KoolAid Mix
  • 2 Liter Water
  • 2 Cup(s) Seltzer (flavored or regular)
  • 5 Scoops Rainbow Sherbert
  • 1 Cup Orange Juice
  • 1 Cup Pineapple Juice

Directions

  • Fill a large punch bowl half-way with ice. Add KoolAid mix, water, orange juice, pineapple juice and seltzer. Let chill in fridge for 1/2 hour before serving.
  • Right before your guests arrive, garnish your punch with rainbow sherbert and a pack of gummi frogs. Use a ladel to serve.

Halloween Cupcakes

Frightfully Good Halloween Cupcakes
These creepy creations, which start from store-bought or homemade cupcakes, are sure to dazzle your Halloween party guests. And they're all wickedly fun to make! Note:  I frost cupcake with choc. icing and then pipe the white icing with a basket weave tip, so it has more icing on it.

1 of 25

The only thing you need to take off this dessert to enjoy is the wrapper.
To make them, follow these steps:
  1. Start with frosted store-bought or homemade cupcakes.
  2. Use a pastry bag with basket-weave tip to pipe on white frosting.
  3. Pipe red frosting on for the mummy's eyes.
  4. Make two dots with black frosting to make the pupils.

Yummy Mummy Cupcakes

.

Some Halloween Ideas from the Friend Magazine

Jack-O’-Lantern Sandwiches

“Jack-O’-Lantern Sandwiches,” Friend, Oct. 1995, 32
1 cup mayonnaise
3 tablespoons minced dill pickle
1 tablespoon mustard
16 slices pumpernickel bread
1/4 pound (113 g) sliced American cheese
1/4 pound (113 g) sliced ham
1. Stir the mayonnaise, pickle, and mustard together.
2. Cut circles out of the bread, cheese, and ham with a 4" (10 cm) round cookie cutter.
3. Using a kitchen knife, cut the eyes, mouths, and noses in half the bread rounds.
4. Lightly spread the remaining bread rounds with the mayonnaise mixture.
5. Top with the ham and cheese rounds.
6. Put the bread faces on top. Cover and chill until ready to serve.

Spooky Spider Races

By Janet Houston
Janet Houston, “Spooky Spider Races,” Friend, Oct. 1995, 33
You will need: two black pom-poms, four small plastic eyes, eight 2" (5 cm) pieces of black yarn, glue, two bendable straws.
Tie four pieces of yarn in the middle with a knot. Glue a pom-pom to the center of the knot. Glue two eyes to the top front of the pom-pom. Repeat for the second spider, and set both aside to dry.
For spider races, mark off Start and Finish lines on a smooth floor and put the spiders behind the starting line. Bend your straw so that the short piece is right behind your spider. Blow into the straw to make your spider move to the finish line. The spiders can also be used for team relay races.

Some Fun

By L. E. Gleeson
L. E. Gleeson, “Some Fun,” Friend, Oct. 1995, 33
I like the sounds of autumn leaves
As they scud and scurry by.
I like the mounds of autumn leaves
As I pile them up so high.
I like the fun of autumn leaves,
For I like to tumble in,
Then wiggle, squiggle, giggle out—
And tumble in again!
[illustrations] Illustrated by Pat Hoggan

Trunk or Treat - An LDS Tradition

Its's Time For Trunk or Treat

Holding a Trunk-or-Treat Halloween activity is a great way to keep Halloween safe. What is a Trunk-or-Treat? It's when several families get together at the church building, park their cars in the parking lot, open up the trunks of their cars, and kids come around to each car to Trunk-or-Treat instead of going house to house to Trick-or-Treat.

You can just have the Trunk-or-Treat part outside or you can have a combined indoor/outdoor party. Here are some fun Halloween activities you can do:

Trunk-or-Treat
  1. Let people know the estimated number of children that will be there so they can know how much candy to bring.
  2. If Halloween is on a Sunday you can hold the Trunk-or-Treat activity on Saturday the 30th.
  3. Those who don't have trunks (or cars) can also hand out candy by standing in-between the cars.
  4. People can even decorate their cars!
Indoor Activities
  1. Pumpkin Carving Contest: People can bring their previously carved pumpkins to be judged and prizes can be given out at the end.
  2. Bat Craft: These are easy to make and decorate. Their wings flap too!
  3. Bobbing for Apples: A barrel, water, apples, and lots of towels.
  4. Halloween Carol Sing Along: Common songs where the lyrics are replaced with Halloween words. Here are some links:

Wednesday, October 6, 2010

Country Gravy

In a large skillet, melt 4 Tablespoons of Butter and 2 Tablespoons of Bacon grease.  Add 4 Tablespoons of Flour and wisk.  If too stiff, add more Butter.  If too thin, add more Flour. 
Brown for a couple of minutes over med. heat.
Add 4 Cups Milk and stir with wisk until thick and bubbly.  This will take several minutes.

Enjoy over hot biscuits!

Sunday, October 3, 2010

Gigging on the Current River

Every year for as long as I can remember, the Mays family have gathered on the banks of the Current River the first night of gigging season.  This usually occurs on Sept. 15th of every year.  The giggers get their boats ready with lights, generator and gig poles (of course) and head out on the river as the sun sets and the night sky starts to appear.  Most of the time the serious giggers go out first (to ensure we have a meal to prepare) and come back for the women and children a little later on.  Different members of the family usually bake desserts and bring side dishes to go with the fish, hushpuppies and potatoes.  And don't forget the deep fried biscuits!  (:Great with butter and apple butter:)
As the first trip returns with the fish, the guys start cleaning and filleting the fish for frying.  Curtis Mays is VERY particular about this process.  The scoring has to be very close together so that the bones basically disintegrate while frying.
Everyone eats too much and has really good time.  Lots of visiting and enjoying each others company occur during this family event.  We look forward to it each year.

Adrienne Turns 17!


Adrienne's birthday is tomorrow.  She wants an ice cream cake from Dairy Queen and a 3 inch lift on her truck!  Well, we'll see how that goes.  We will add some pics tomorrow.

Broccoli-Rice Casserole

1 Stick of Butter
1/4 Large Onion, chopped finely
1/4 Cup Celery, chopped finely
16 oz. Pkg. Broccoli florets, steamed until tender crisp
2 Cups Minute Rice, uncooked
1 Cup of Water
1 Cup of Milk
1 Can Cream of Chicken Soup + 1/2 Can of Water
1 8 oz. Pkg. Velveeta Crumbles or thick shredded cheddar cheese
Pinch of Salt

Preheat oven to 350 degrees.  Melt the butter in a large skillet and add the onion and celery.  Saute until tender and opaque.  Meanwhile cook the broccoli until tender crisp. Drain.  Sprinkle rice in the bottom of a 9 x 13 casserole dish.  Mix water, milk, soup and the 1/2 can of additional water in a bowl.  Add sauteed veggies, broccoli, salt and cheese.  Pour over rice.  Bake for 20 to 25 minutes, uncovered.  Let sit for 10 minutes before serving.

Great side dish for lots of different entrees.

Saturday, October 2, 2010

October Sharing Time Ideas

1st Sunday - General Conference.  Great Conference activities for Nursery, Jr. Primary, Sr. Primary and Youth at http://www.sugardoodle.net/  You can download them and print them off.  They are awesome!

Weston's Birthday Collage

This is a collage we did on My Memories Suite 2.  We printed it off to frame and saved it as JPG file to send to the blog.  Don't know what happened in the top right corner during the transfer?

Friday, October 1, 2010

End of Fall Baseball Season

Well, Austin played his last baseball game for the fall season last night.  It went well.  Winona won 9-4 against Neelyville.  Austin played 3rd base and pitcher on the varsity team.  He is also a Freshman .  Austin's stats for the season:

 Batting Average: 338                                                                                                      
Home Runs:  1
 RBI:  8
 Pitching: 7 No Hit Innings in 2 Games

Cheesy Mostaccoli

1 16 oz. package Penna noodles
1 1/2 lbs. ground chuck
1 can cheddar cheese soup
1 28 oz. jar spaghetti sauce
1 teaspoon Italian seasoning
3 cups shredded mozzarella cheese
salt and pepper

Cook noodles according to package directions.  Brown ground chuck in a large skillet.  Drain grease.  Add soup, seasoning and spaghetti sauce.  Simmer.  I use a large stoneware bowl, but you can use any large casserole dish.   Put noodles and meat sauce in large casserole dish with 2 cups of the mozzarella cheese, mix together well.  Bake at 350 degrees for about 40 min.  After 30 minutes add the other cup of mozzarella cheese on top to melt.  Serve with garlic bread and Cesar salad.

Thursday, September 30, 2010

The Twins are Here!

Sarah and Ryan's twin girls, (Daisy & Violet) were born on June 15th, 2010.  They weighed in at 6 and 7 lbs.  Wow!!  We are so anxious to see them.  Be sure to check out our family photos page to see all the pics.

Tuesday, September 28, 2010

A Good Friend Indeed

We are all kind of sad today.   Our beloved yellow lab of 10 years, Lady, had to be put down today.  She seemed to have a severe case of hip displacia.  She was a good companion and playmate for all the kids.  Even though she never had a litter of pups of her own, she fondly took in all the pups we have had over the years, as if they were her own.  She even went out of her way to get along with all  my cats.  She will be missed by all of us.

Introduction

Welcome to The Mays Family Matters Blog.  This blog is mainly to let friends and extended members of the family know what is going on with all of us here in Winona and members of our family in North Dakota.  We will be posting a variety of things that might be of interest to you, like family recipes, family photos, family happenings, family traditions and special dates in our family.  Also, lots of links we like to go to.  We will also be posting lots of crafts and homemaking ideas and a little later on we will be having an "on-line" yard sale!!
So, check back often and be sure to leave a comment.